The LCD display (16×2) with I2C module, commonly known as the HW-061, is a popular choice for displaying information in Arduino projects due to its simplicity and ease of use. Here’s an introduction to this module:
Overview:
The HW-061 is a liquid crystal display (LCD) module that consists of a 16-character by 2-line (16×2) display with an I2C (Inter-Integrated Circuit) communication interface. It combines the traditional 16×2 LCD display with a small I2C module, allowing for easy interfacing with microcontrollers like Arduino.
LCD Display (16×2) with I2C module (HW-061) Key Features:
- 16×2 Character Display: The module can display up to 16 characters per line and has two lines, providing a total of 32 characters for displaying information.
- I2C Interface: The I2C interface simplifies the connection between the LCD module and microcontrollers like Arduino, requiring only two wires (SDA and SCL) for communication.
- Backlight Control: Some variants of the HW-061 module feature a built-in backlight that can be controlled via software to improve visibility in low-light conditions.
- Adjustable Contrast: The contrast of the LCD can often be adjusted using a potentiometer located on the module, allowing for optimal readability.
- Low Power Consumption: LCD displays typically consume very little power, making them suitable for battery-powered projects.
I2C module (HW-061) Pinout:

The HW-061 module usually has the following pinout:
- GND: Ground connection
- VCC: Power supply (typically +5V)
- SDA: Serial Data line for I2C communication
- SCL: Serial Clock line for I2C communication
- A (Optional): Anode pin for backlight (connected to +5V)
- K (Optional): Cathode pin for backlight (connected to GND)
Advantages:
- Simplicity: The I2C interface reduces the number of wires required for communication, simplifying wiring and making the module easy to use.
- Space Saving: The integrated design of the LCD display and I2C module saves space on the breadboard or PCB compared to traditional parallel interface LCD modules.
- Wide Compatibility: The HW-061 module is compatible with various microcontrollers and development boards, including Arduino, Raspberry Pi, and others, making it versatile for different projects.
Common Applications:
- DIY Electronics Projects: The HW-061 module is commonly used in DIY electronics projects for displaying sensor data, messages, and menu interfaces.
- Home Automation: It can be integrated into home automation systems for displaying status information and control interfaces.
- Weather Stations: LCD displays are often used in weather stations to show weather data such as temperature, humidity, and atmospheric pressure.
- Educational Purposes: LCD displays are popular in educational settings for teaching electronics and programming concepts due to their simplicity and versatility.
Basic Coding:
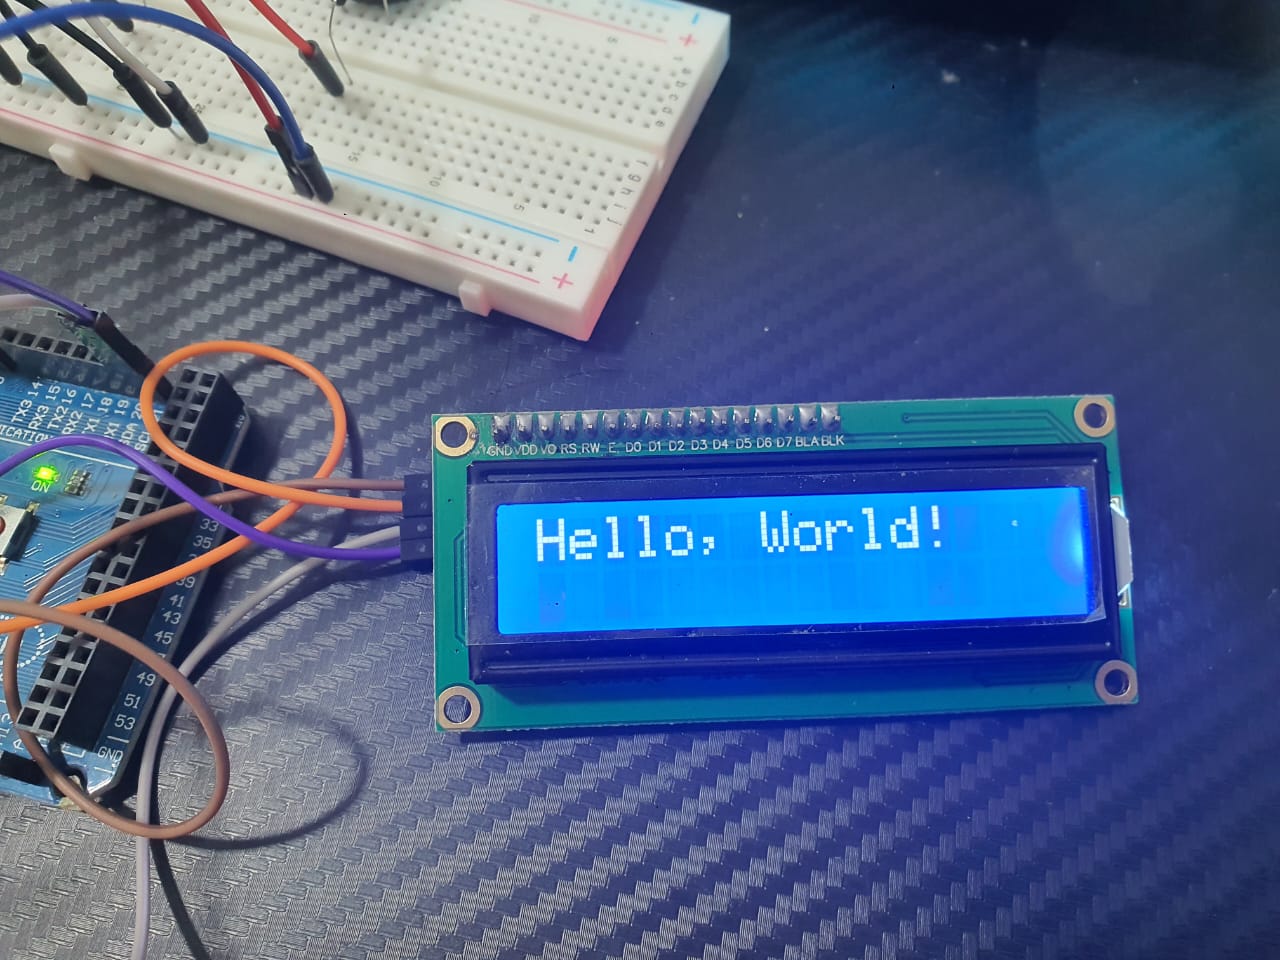
Below is an example Arduino code that demonstrates how to display a custom message (“Hello, World!”) on an LCD Display (16×2) with an I2C module (HW-061) using the LiquidCrystal_I2C library:
#include <Wire.h>
#include <LiquidCrystal_I2C.h>

// Set the LCD address to 0x27 for a 16 chars and 2 line display
LiquidCrystal_I2C lcd(0x27, 16, 2);

void setup() {
  // Initialize the LCD
  lcd.init();
  // Turn on the backlight
  lcd.backlight();
  // Set the cursor to the first column of the first row
  lcd.setCursor(0, 0);
  // Print the message
  lcd.print("Hello, World!");
}

void loop() {
  // Nothing to do here as this is a simple example
}
To present a numerical value, this code snippet closely resembles the preceding example. It undertakes familiar steps: initializing the LCD screen, activating the backlight, positioning the cursor, and subsequently displaying the number “12345” on the screen.
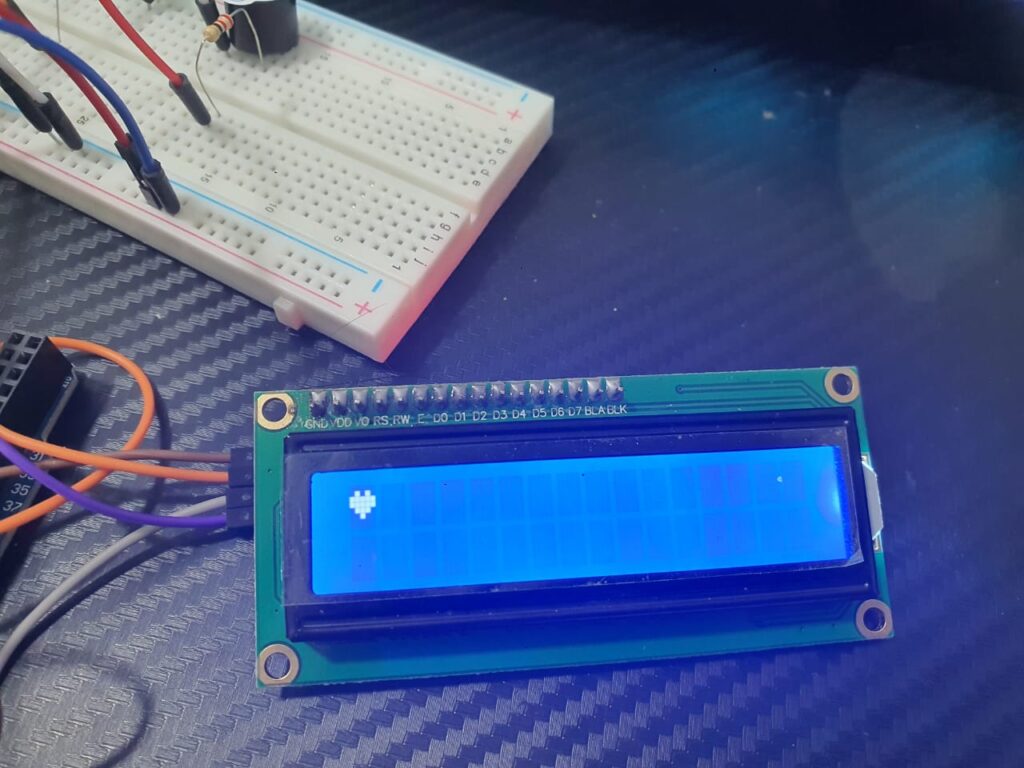
Below is an example Arduino code that demonstrates how to display a custom heart symbol:
#include <Wire.h>
#include <LiquidCrystal_I2C.h>

// Set the LCD address to 0x27 for a 16 chars and 2 line display
LiquidCrystal_I2C lcd(0x27, 16, 2);

// Custom heart symbol data
byte heartSymbol[8] = {
  B00000,
  B01010,
  B11111,
  B11111,
  B01110,
  B00100,
  B00000,
  B00000
};

void setup() {
  // Initialize the LCD
  lcd.init();
  // Turn on the backlight
  lcd.backlight();
  // Create a custom symbol at location 0
  lcd.createChar(0, heartSymbol);
  // Set the cursor to the first column of the first row
  lcd.setCursor(0, 0);
  // Display the custom symbol
  lcd.write(byte(0));
}

void loop() {
  // Nothing to do here as this is a simple example
}
This code demonstrates how to create and display a custom heart symbol on an LCD display using an Arduino and the LiquidCrystal_I2C library. You can customize the heartSymbol array to create different symbols as needed for your project.
Conclusion:
This LCD display is a versatile and easy-to-use display module suitable for a wide range of Arduino projects and other electronics applications. Its combination of a 16×2 LCD display with an I2C interface simplifies wiring and makes it an ideal choice for hobbyists, educators, and professionals alike.
Expertise on Engineering.
Robotic and microcontroller are like toys to me.
I love playing with them.