How does HW-038 Water Level Sensor work? The HW-038 water sensor is designed to detect the presence of water and measure the water level by leveraging the conductivity of water. It consists of a series of parallel exposed traces that act as electrodes. Here’s a detailed explanation of how it works:
Components and Working Principle
- Conductive Traces:
- The sensor has a PCB (Printed Circuit Board) with a set of parallel exposed traces.
- These traces are conductive and act as electrodes that can detect the presence of water.
2. Water Detection:
- When the sensor is placed in water, the water bridges the gaps between the exposed traces.
- This bridging creates a conductive path between the traces, changing the electrical resistance between them.
3. Analog Output:
- The change in resistance alters the voltage at the signal output pin of the sensor.
- The sensor outputs an analog voltage corresponding to the amount of water bridging the traces. The more water there is, the more traces are bridged, leading to a higher output voltage.
Pin Configuration
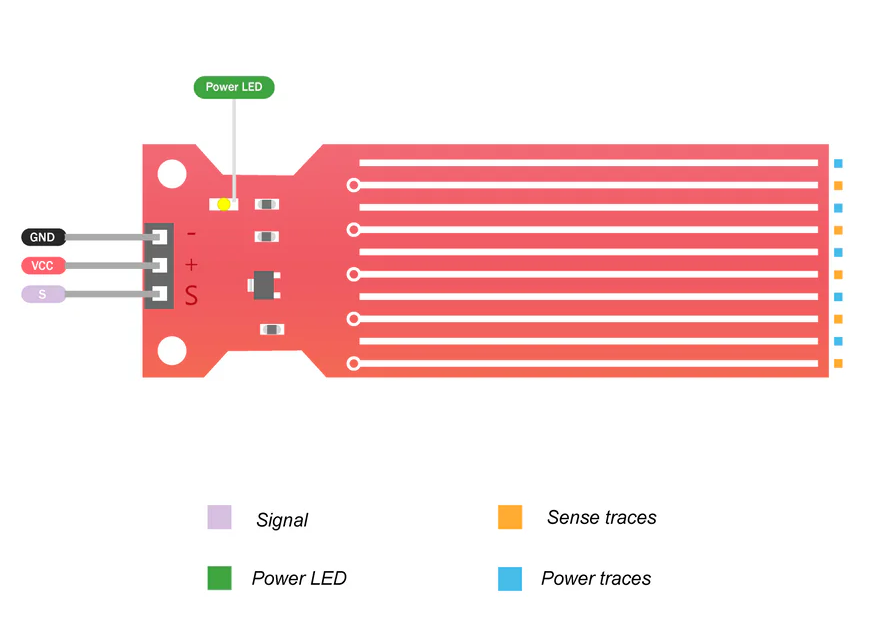
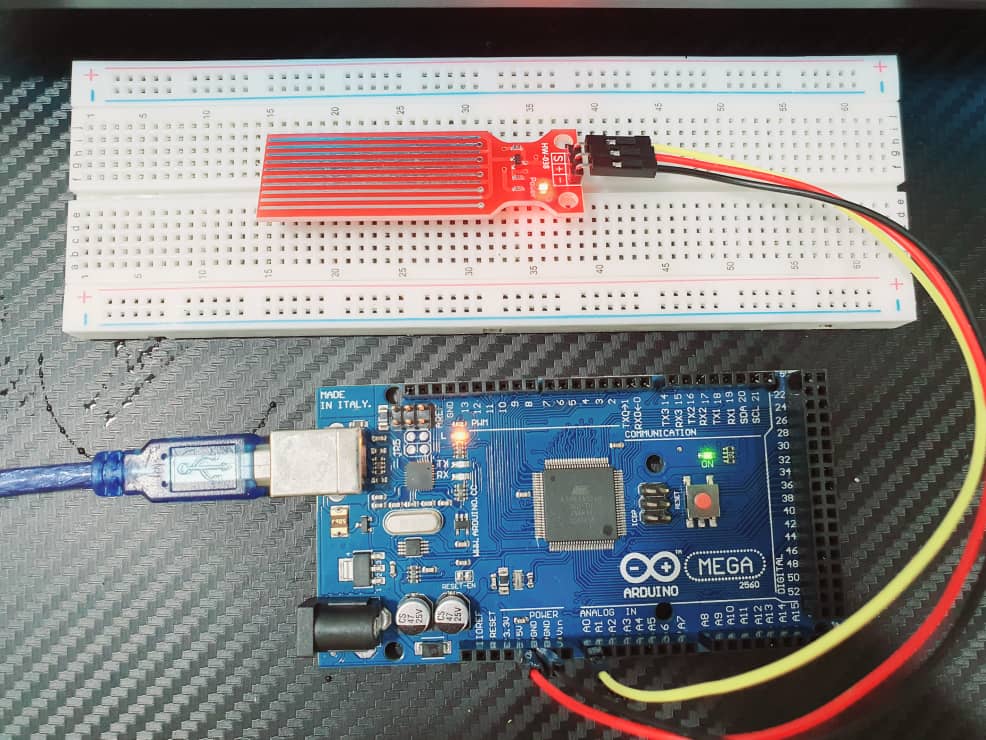
- VCC: Power supply (3.3V to 5V)
- GND: Ground
- S: Signal output (analog output)
How to Use HW-038 Water Level Sensor with Arduino
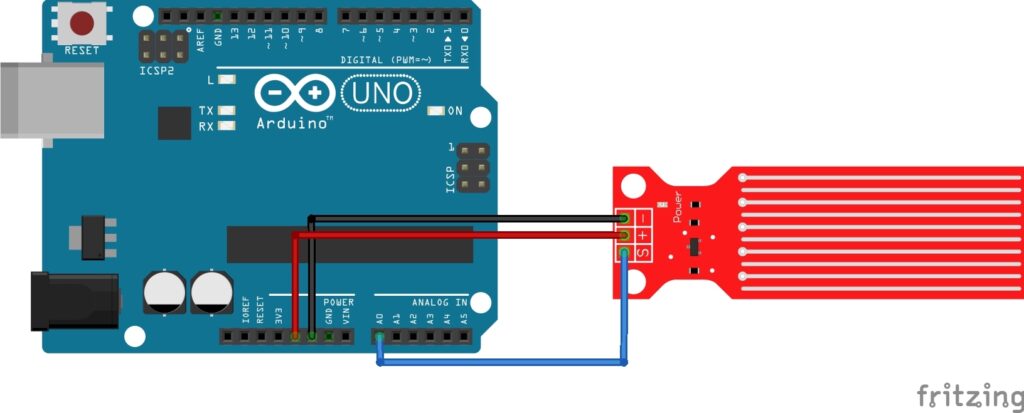
Components Needed
- HW-038 water level sensor
- Arduino board (e.g., Arduino Uno)
- Connecting wires
- Breadboard (optional)
Connecting the Sensor
- VCC: Connect to the 5V pin on the Arduino.
- GND: Connect to the GND pin on the Arduino.
- S: Connect to an analog input pin on the Arduino (e.g., A0).
Example Code
// Define the pin for the water level sensor
const int sensorPin = A0; // Analog pin A0

void setup() {
  // Initialize serial communication at 9600 baud rate
  Serial.begin(9600);
}

void loop() {
  // Read the analog value from the sensor
  int sensorValue = analogRead(sensorPin);

  // Convert the analog value to a corresponding voltage
  float voltage = sensorValue * (5.0 / 1023.0);

  // Print the analog value and voltage to the serial monitor
  Serial.print("Analog Value: ");
  Serial.print(sensorValue);
  Serial.print("  Voltage: ");
  Serial.print(voltage);
  Serial.println(" V");

  // Delay for a short period to avoid flooding the serial monitor
  delay(1000);
}
After uploading the sketch, open the Serial Monitor to view the output. When the sensor is dry, it will output a value of 0. As the sensor is immersed in water, the output value will gradually increase.
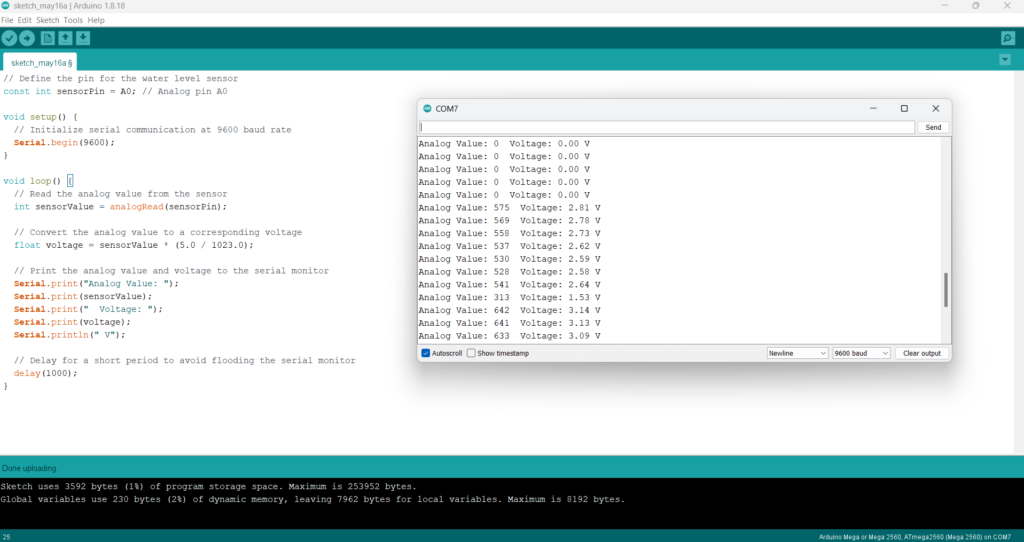
Explanation of the Code
- Pin Configuration: The sensor’s signal pin is connected to analog pin A0 of the Arduino.
- Setup Function: Initializes the serial communication for monitoring and debugging.
- Loop Function:
- Reads the analog value from the sensor.
- Converts this analog value to a voltage.
- Prints the analog value and voltage to the serial monitor for observation.
Applications of HW-038 Water Sensor
- Leak Detection: Placing the sensor in areas prone to water leaks to detect the presence of water.
- Water Level Monitoring: Monitoring water levels in tanks, reservoirs, or containers.
- Automated Watering Systems: Ensuring appropriate water levels in soil or hydroponic systems.
Conclusion
The HW-038 water level sensor is a versatile and easy-to-use component for various water detection and level monitoring projects. By leveraging the conductivity of water to alter the resistance between its traces, it provides an analog voltage output that can be read and processed by microcontrollers like the Arduino. This makes it suitable for applications such as leak detection, water level monitoring, and automated watering systems.
Expertise on Engineering.
Robotic and microcontroller are like toys to me.
I love playing with them.